
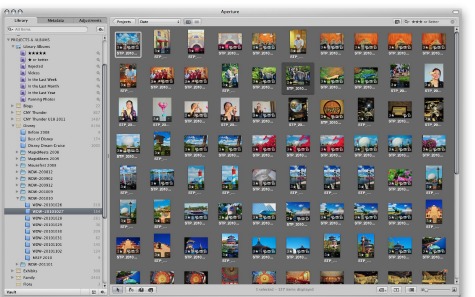
Working with photos in Apple Aperture 3 software.
When I return from a trip to Walt Disney World, I can have hundreds of photos to edit, process and finish. Here is how I go about handling these large amount of photos. The process is called a workflow and I am posting it to help my fellow Disney photographers who find themselves overwhelmed with the task of managing large digital photography libraries.
I use Apple’s Aperture 3 photo editing and management software on a MacBook Pro laptop. Adobe’s Lightroom is a similar package for Windows and OS/X systems.
1. It all starts with my Nikon D700 camera’s Picture Control settings. I use settings to allow me to shoot in JPEG for my Disney trips.
2. When I ingest or import the photos on my computer using Aperture 3 into a new Project, I have an Import Pre-Set specifically for the Picture Control I used which adds color vibrancy, a bit of contrast, auto-levels and sharpening. This gets the photos very close to being processed and saves me oodles of time. The pre-set adds generic captions, keywords, location, ownership and copyright to each photo’s metadata. Import Pre-sets are immensely useful and time saving.
3. After importing, I immediately backup the photos onto an external hard drive. Later, I will upload to a Smugmug.com gallery under my Backup category. I usually do that overnight.
4. For these Walt Disney World trips, I then break out each day into a separate album within the overall folder for the trip and, using Aperture 3’s batch processing, add more keywords which are specific to the park, resort, restaurant, etc. in the photos. This further describes the photos making it easier for me to find specific photos in the future.
5. Editing each photo is done in two passes. In the first pass I look for focus issues and composition. I look around the edges, backgrounds, people’s expressions, closed eyes, under or over exposure and other technical flaws. All those photos I mark rejected and later delete. On the second pass, I give a rating of 1 Star for the photos I feel are good enough to do final processing on.
6. Processing or finishing. I go through each 1 Star photo and really look at each one. If I still like it, I crop the photo (if needed) and do final adjustments. If I do not, I mark it rejected. You crop before adjustments so you only adjust what the final photo will look like. Adjustments I normally do is straightening, pulling back highlights, opening up shadows, add contrast and/or brightness. Each finished photo gets a 2 Star rating.
7. Once I finish up a day, I upload them to a gallery on Smugmug.com for viewing by friends, family and sharing with other Disney fans here and on Twitter, Facebook, Google Plus and Disney forums.
Whew, that is a lot of work but the results are worth it.











Scott,
Great info. Thanks. How long does this take to do? That’s always been the barrier to me doing more than importing into iPhoto and making an album and a little editing.
Scott replies: Once you learn the software which does take an investment in time, I usually only spend a minute on each edit. Of course, there are those photos and sets of photos (ie., HDR) which take longer. They old “it depends” is in effect here. Using import presets and batch processing for adding captions and keywords really speeds up the work. In the long run, that saves me hours and hours of time processing.
I highly recommend you check out Aperture 3. It is a bargain from the Mac App Store or download the trial and see.