
After I found out I was going to be attending Extra Magic Hours at night in Disney’s Animal Kingdom. I had this photo idea in my head. The Yeti Shrine at night with Expedition Everest beautifully lighted in the background. I knew I would need a tripod, remote shutter release and a lens that could handle the sweeping image I had dancing in my head like the Tokina 11-16mm f/2.8 lens I have.
Now, you can imagine my disappointment when I rounded the corner and saw the scene below which greeted me. I never thought the Yeti Shrine would NOT have a light or two on it like the stone column off to the right.
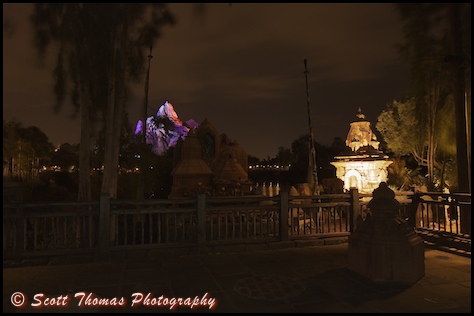
Unlighted Yeti Shrine.
Nikon D70/Tokina 11-16mm, 25s, f/11, ISO 200, EV +0.3, 16mm focal length, tripod
As I pondered this I came upon another idea. An even better one as it turns out. I took out the Nikon SB-600 Speedlight (flash unit) from my camera bag and set it and my camera to trigger the flash remotely. On any Nikon dSLR cameras with a pop-up flash, you can use the Nikon Creative Lighting System (CLS) with either the SB-600, SB-800 or SB-900 Speedlights. Other Nikon dSLR cameras will need either an SB-800, SB-900 or the SU-800 Commander Unit. If you own another camera brand, refer to your manual to see how you can set up remote flash.
I am not going into the detail on how to use the CLS (see link and Google for more information) this time but just give you the results you see in the next photo. Here is the photo I had in my head. By using off-camera flash held at camera left, I angled it in such a way as to illuminate the Yeti Shrine. I set the camera to Rear-Sync Flash mode to capture the purple-white colors of Expedition Everest in the background.
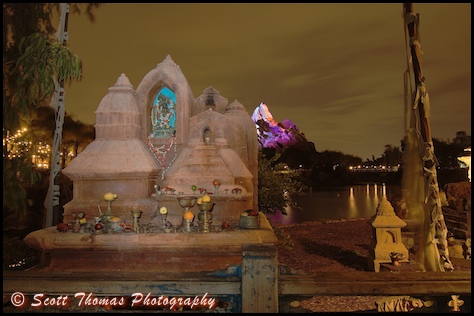
Illuminated Yeti Shrine.
Nikon D70/Tokina 11-16mm, 25s, f/8, ISO 200, EV +0.3, 16mm focal length, tripod, rear-synced off-camera flash at -1 power
What do you think? See, flash is not a dirty word but another tool to correctly expose your subjects.










Scott, this is awesome. I did some EMH shooting at AK last week from this very spot, but now that I’m thinking about it, I can’t recall what I did about the lighting problem. I only got home last night, so I’m eager to look at my photos and compare!
Scott replies: Please, post what you got. I know there is more than one way to capture a Yeti!
Beautiful! In all of our many trips to AK, we have never been during the evening hours. That will definitely change now! Scott, I love all of your photos. I change my desktop background nearly every week thanks to you 🙂
-Lori.
Scott replies: Have you seen the desktop page here at AllEars, Lori? Lots of great wallpapers to choose from.
HI Scott!
Very cool trick! Great thinking! I’m glad it worked out as you intended. Great shot!
Question: is that the same shrine that I’m told has an identical outline to the peaks of Everest behind it? I’m told if you stand in the right spot in front of the shrine (if this is the same shrine that is), you can see Everest behind/over it and they have the same silhouette.
Scott replies: Yes it is. If you click the Yeti Shrine link in the article, Barrie has a photo with the perfect angle to show that it does.
Love it! There are few images I love more than Everest after dark. Thanks for the great shot!
Scott replies: AK at night was beautiful. It is much darker than any of the other parks at night. But where there is light and color, it explodes at you through the viewfinder.