
In my recent article on Using a Tripod at Walt Disney World, I talked about the advantages of using a tripod over trying to hand hold a camera when light levels are low like at night. This week I want to show you by comparing two photographs of the same subject using both techiques.
I carefully chose the subject and took the photos from the same location. For the first photo of Fulton’s Crab House Restaurant in Downtown Disney’s Marketplace, I steadied myself as best I could against a railing and used Joe McNally’s Da Grip with an image stablized (IS) lens. Nikon calls theirs vibration reduction (VR) lenses. To get a proper exposure, I had to increase the ISO to 1600 and use an aperture of f/5.3 to get a shutter speed of 1/13th of a second. This is quite hard to hand held and I took a series of shots with this one being the best.
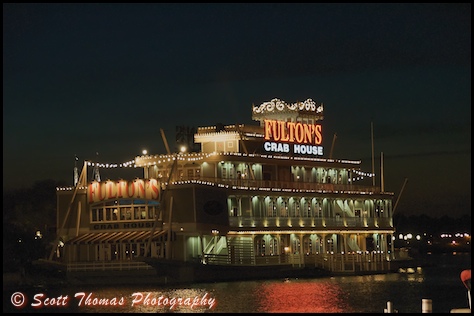
Fulton’s Crab House taken Hand Held.
Nikon D70/18-200VR, 1/13s, f/5.3, ISO 1600, EV +0.3, 80mm focal length
I do like this photo. The reflection of the lights in the water ripples and the lights and signs of the restaurant are nice but it’s dreary for lack of a better word. It doesn’t reach out and grab my attention.
In the second photo where a tripod was used, I was able to set the ISO at 200 for less noise and an aperture of f/22 which gave the lights a nice star effect. The shutter speed climbed to 30 seconds which allowed more light to hit the sensor. You can see more definition in the outside lighting and you can see more of the inside lighting. The long exposure smooths out the water ripples and reflections so they are not as pronounced but I find it a very pleasing result. This photo does grab my attention. What do you think?
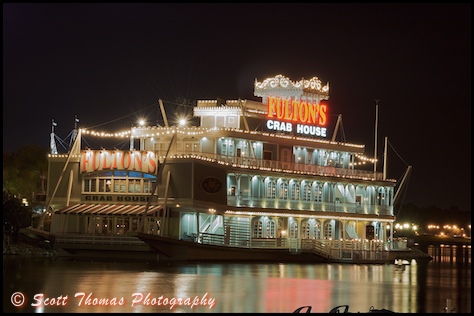
Fulton’s Crab House taken using a Tripod.
Nikon D70/18-200VR, 30s, f/22, ISO 200, EV +1.0, 82mm focal length




If standing on the bridge between Tomorrowland & Fantasyland (want to get photo of Tinkerbell flying) where do I perch my Gorilla-pod?
Scott replies: Connie, if you want to get Tink flying, the best way is to pan your camera. Using a gorrilapod could work if you catch her before she flys and is not moving. That’s hard to do as she doesn’t stay still for long.
Best place…if you have a telephoto lens, the Noodle Station Terrace and use either one of the tables or the fence for the gorrilapod. In closer, say around the Ice Cream Palor and find a high post would be my best guess. You’ll need to get the camera above people’s heads.
Well, I hesitate to comment, because I see I am alone in my opinion. I personally like #1, because to me, #2 is a bit over-exposed. The sign in #1 is easily read, and not in #2. The rest of the lights don’t have a warm appeal to them.
Have a good day and thanks for all the great info your team give us everyday!
Becky*
Scott replies: I’m glad you did comment, Becky! You point out valid differences which I failed to notice. Thanks!
Hi, in WDW last christmas – new year’s i (unsuccessfully) tried to take photos of Fantasmic, Wishes, & Illuminations. They came out, sort of. After i developed them, i found out that my night setting on the camera in combination with a tripod would have taken perfect photos of all these events. the night setting shows the shutter speed. I found a wonderful tripod thru L.L.BEAN called a gorilla grip, that is a flexible tripod that can also be wrapped around a railing or tree or whatever (rail at Rose &Crown ). I can’t wait to go back to WDW to try it out.
thanks, andrea
Scott replies: Andrea, those gorrillapods are wonderful to use at WDW. I have used them for my camera and for off-camera flashes. Very handy. We have them in the AllEars Amazon Store here in any one is interested:
http://astore.amazon.com/debsunoffiwaltdi?node=26&page=2
Definitely #2!! I get so frustrated with low-light situations that I hate shooting even late in the day. Even when it’s bright out I tend to have my SB-600 on for good measure. I love light but if you keep showing us pics like #2 I might be encouraged to work a bit harder at my night shots!! Thanks man.
Scott replies: Thank you, Josh! As I have said, this was the first time I used a tripod at WDW. I definitely love the results. Boris and I pointed out some alternatives to tripods in the comment before yours which you might like to try.
The SB-600 is a great tool to help. I will have some examples of using one at WDW later this year.
Hi and thanks for the good info.
You can also use any available stationary object to set your camera on, and then use the self timer to trigger the shutter. If the URL link for this post works, I have a picture of the windmill from Stormalong Bay posted that I took in the late evening by just setting my camera on a rock by the pool.
The other thing I learned with using my tripod is exactly what you mentioned, it’s much better to use a lens stopped down with a long exposure time, than to try a wide open lens with a short exposure.
Regards,
Boris
Scott replies: That’s a great shot, Boris! Love the colors and the motion you captured with the windmill. To see Boris’ photo, click on his name below.
You make a good point of using available things as a tripod subsitute. Trash cans, or quadpods as Disney photographers like to call them, are another handy way to steady your camera. I like to use a bean bag so I have some control of where the lens is pointed when using trash cans, tables or tops of posts and walls.